Cactus Transplant 101: Everything You Need to Know
Cactuses are famous for being tough, low-maintenance plants. However, even these prickly survivors need proper care, especially when it’s time to transplant them. Moving a cactus to a new pot or location requires the right approach to prevent damage and ensure its continued health.
In this guide, we’ll walk through the best practices for transplanting cactuses successfully. From timing it perfectly to handling their sharp spines safely, you’ll learn easy tips to give your cactus a stress-free move to its new home. Let’s get started!
Contents
- 1 When’s the Best Time to Transplant a Cactus?
- 2 Transplanting Cactuses: Step-by-Step
- 3 Transplanting Cactus Pups: Step-by-Step
- 4 Post-Transplant Cactus Care
- 5 10 Final Tips for Transplanting Cactuses
- 5.1 Tip 1: The best repotting time is March-May
- 5.2 Tip 2: Completely dry soil makes repotting easier
- 5.3 Tip 3: Use root hooks or chopsticks to remove stubborn soil
- 5.4 Tip 4: The ideal mix combines organic and inorganic materials
- 5.5 Tip 5: Sterilize potting mix before using
- 5.6 Tip 6: Pot diameter should be 1/3 of cactus height
- 5.7 Tip 7: Add drainage layer to prevent soil sogginess
- 5.8 Tip 8: Protect yourself from cactus spines
- 5.9 Tip 9: Wait to water newly transplanted cactuses
- 5.10 Tip 10: Recycle broken terra cotta pots for drainage
When’s the Best Time to Transplant a Cactus?
There are several reasons to transplant a cactus. Most commonly, the plant has outgrown its current pot, which typically happens every 2-4 years. Signs your cactus needs a bigger home include:
- Roots visibly poking out the pot’s drainage holes
- The cactus crown reaching the pot’s edge, especially for short, wide pots
You’ll also need to transplant after purchasing a new cactus, since nursery pots often lack ideal cactus soil. Repotting also allows refreshing the plant’s soil or separating new offshoots to grow independently.
Regardless of the reason, summer or a dry season is ideal for transplanting. The cactus can better withstand any accidental injuries when conditions are warm and arid. Just be sure the soil is fairly dry, not freshly watered.
Transplanting Cactuses: Step-by-Step
Ready to give your prickly pal a new home? Follow these steps:
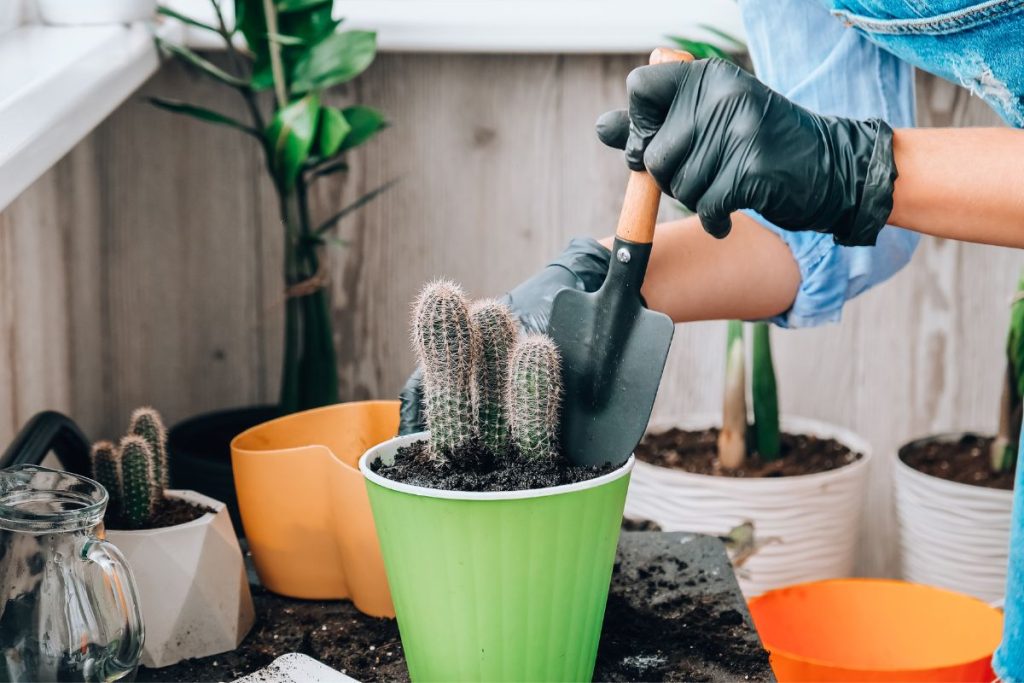
- Loosen the soil around the edges to remove the cactus easily. For plastic pots, you can squeeze the sides. Otherwise, run a dull tool between the inner pot and soil.
- Protect yourself first! Wear thick gardening gloves or leather ones, and wrap the cactus in newspaper before lifting if needed.
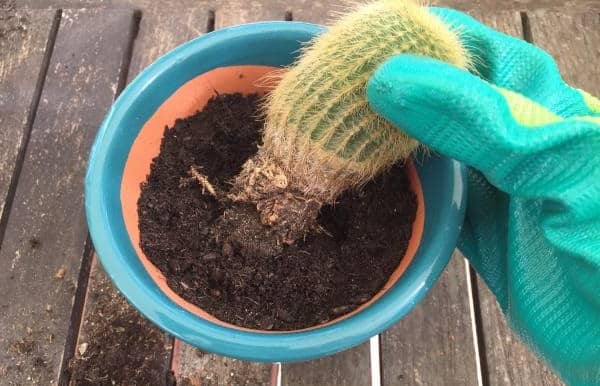
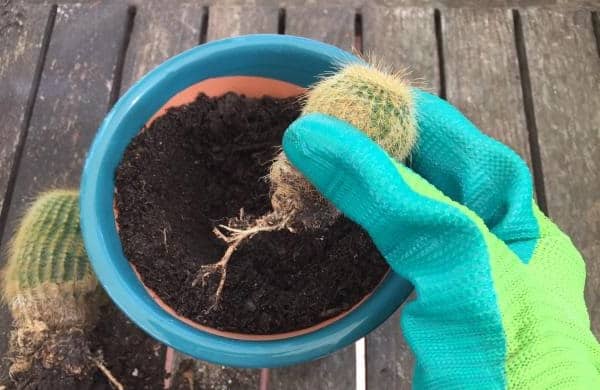
- Gently brush or rinse away the old soil from the roots, using little pressure.
- Inspect the roots, pruning off any rotted sections with sanitized shears. Treat any pests or fungi with a cactus-safe fungicide or pesticide.
- Optional: To promote new growth, trim the longest roots by half.
- Allow the cactus to dry for up to 4 days before repotting if roots were damaged. You can also dust with cinnamon fungicide.
- Add a 1-2 inch layer of gravel or other drainage material to the new pot’s base, then cactus potting mix.
- Carefully place the cactus in the center. Don’t press down.
- Fill in around the plant with more cactus mix, burying the roots fully.
Transplanting Cactus Pups: Step-by-Step
The process for transplanting cactus offshoots is similar but with some differences:
- Carefully detach any pups from the parent plant. Look for ones with longer root systems.
- Use your finger or a tool to make a planting hole in the new pot’s soil. Place the offshoot inside.
- Backfill soil around the base, firming lightly with your fingers if needed.
- Give just a few drops of water. Too much moisture can rot young plants.
- Set the pot in a dry, sunny spot while it establishes new roots.
Check out our other post for more on propagating cacti from offsets and cuttings!
Post-Transplant Cactus Care
After transplanting, cacti need some extra precautions, especially against excess moisture that can cause rot. Skip watering for several weeks after an adult cactus transplant.
Use a fast-draining cactus soil mix like: 2 parts peat, 2 parts potting soil, 1 part sand or perlite, and 1 part lava rock or gravel. Adding a layer of gravel or lava rock on top further improves drainage.
Always empty drainage trays of excess water after watering. Better yet, elevate pots slightly above trays or saucers to allow full drainage.
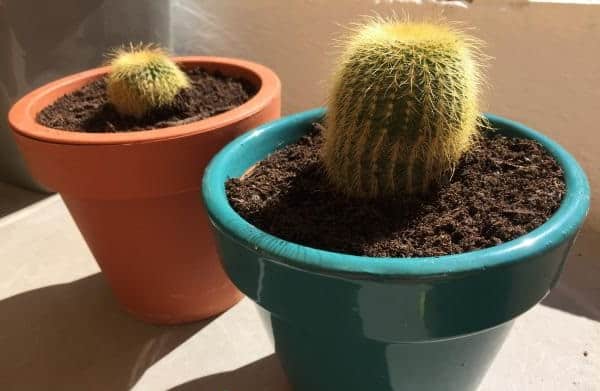
With the right soil, pot size, and watering approach, your transplanted cactus will thrive for years! Stay tuned for our outdoor cactus care guides.
10 Final Tips for Transplanting Cactuses
Tip 1: The best repotting time is March-May
Any move to a new pot or location stresses cactuses. Right after their winter dormancy ends is the least stressful transplant timing. For hardy outdoor cactuses, wait until the soil is fully thawed.
Tip 2: Completely dry soil makes repotting easier
Transplanting when the potting mix is very dry is ideal. Dried out roots detach from the pot or ground much more readily.
Tip 3: Use root hooks or chopsticks to remove stubborn soil
Fresh potting mix allows faster cactus growth when less old soil clings to the roots. Gently rake away any stuck-on mix using a bonsai root hook or chopstick. Inspect exposed roots too, pruning any mushy or rotten sections.
Tip 4: The ideal mix combines organic and inorganic materials
Quality cactus soil provides structure while allowing water drainage. Combining organic and mineral components achieves this. Good mixes include:
- 60% cactus potting mix + 20% lava rock + 20% perlite
- 30% peat + 30% compost + 20% perlite + 20% lava rock
For garden beds, amend heavy soils with sand, perlite, pumice and peat. Sandy soils need compost or topsoil mixed in. Avoid standard potting soils – their high organic matter risks rot.
Tip 5: Sterilize potting mix before using
No matter what growers claim, it’s wise to pasteurize bagged mixes yourself to kill any pathogens. Simply:
- Place mix in an oven-safe dish with a loose lid
- Bake at 300°F for 30 minutes, then allow to cool
- Or, microwave the dish for 10 minutes at 800 watts
Tip 6: Pot diameter should be 1/3 of cactus height
Don’t just upsize a few inches – proper pot sizing helps cactuses thrive. Choose a new pot with a diameter 1/3 the cactus height. For very tall specimens over 3 feet, use 1/4 to 1/6 diameter instead.
Also consider root shape. Wide, shallow bowls suit spreading roots while taproots prefer deeper pots.
Tip 7: Add drainage layer to prevent soil sogginess
While excess moisture drains from garden beds, potted cactuses risk staying waterlogged if the pot can’t shed it. This rots the roots.
Protect cactus roots by adding a drainage layer before potting mix: 1-2 inches of gravel, lava rock, pot shards, etc. Cover this with landscape fabric to prevent soil mixing in.
Tip 8: Protect yourself from cactus spines
The longer and denser a cactus’ spines, the more Hand protection is essential. Thick leather gloves, multiple layers of newspaper, or foam sheets let you handle them safely. Micro-spines like those on opuntias require extra caution.
Tip 9: Wait to water newly transplanted cactuses
Give freshly potted or transplanted cactuses a week before watering again as they recover. Keep them in bright, indirect light while roots re-establish.
Tip 10: Recycle broken terra cotta pots for drainage
Don’t toss cracked clay pots! Break them into shards and use the pieces as economical drainage material in cactus containers. Just be sure to sterilize first by baking or microwaving.